Monday, August 20, 2018

Feeling Sore

2018 has turned out to be a big year for us. I thought 2017 was nuts, with lots of weekends away, the long absence of Steve and the Big Travels at Christmas time, but it looks like 2018 wasn't content to be a quieter year at all. Instead we have been inundated with big decisions, trips away and changes galore. I think I mentioned it here.

Let me illuminate. We've done four trips to Bundaberg already, and I've got plans for a fifth in the first week of the September school holidays, as well as a camping trip for the long weekend in October. On top of that, we've decided 2018 is the year for a real renovation on our house.

We've been living in our house for eight years this October, and since we bought it, we have dreamed of putting a deck on the back. Our yard is enormous, there is room for it, and given that we live in Queensland, it would be just perfect to have a deck. But the logistics of getting the deck on, where the access would be, what we would have to do about the laundry part of the house, moving the clothes line, all seemed to be in the way, not to mention the financial side of putting on a deck. So we put it off for a while.

Then we had kids, and I started a family day care. We keep looking around at things, and wanting a deck and possibly a second bathroom, and a study for Steve so he could work from home, and wondering if we would ever get to it. And in January we started to have real conversations about what it would look like if we were to actually do it. What did we really need vs what did we want?

I spent six weeks calling builders and all sorts of people, trying to get an idea about the process that is renovation and what was needed. The whole process is quite complicated, but we finally figured out which route to take. Steve spent a fair amount of time on virtual house design programs, shifting things around and trying to help us get an idea of what we wanted and how it might fit together. He even bought a whiteboard for brainstorming.

In the end, we used a planning company to make the plans, and then had builders quote on it to see if we could afford it. After the six weeks from the end of January, the planning stuff took another two months, and then getting the builders to quote on it took another six weeks. Finally, after our initial conversations in January, we had everything we needed to get started. After such a long time, I think I'm finally getting excited for what the end product of the renovation will be.

Of course, there are things we have to do to get ready for said renovation to start (approximately two weeks!).


We have moved our garden bed and the clothes line, both of which were previously in a space that the deck would impact on. The girls have been very helpful and also enjoyed the bonus wheelbarrow rides that Steve offered them as reward for their service.


Steve's ripped up a whole lot of weedy-grass front lawn ready for us to transplant some of the awesome Sir Walter from the back to as well. Steve and I, though probably mostly Steve, are feeling really sore today from these arduous tasks.


The clothes line was the original old Hills Hoist which is just an amazing clothes line. I'm so appreciative of Steve putting in most of the work to move it for me, (and our neighbor Ian who popped round to help with the lifting) rather than just get rid of it and get a new line. On no modern clothes line will I be able to fit five loads of washing and have them all dry in two hours because of the great spacing allowed.


Remember that I finished painting the downstairs toilet in February? Well it's been a good six months with that shiny clean toilet, that is now part of the house that will be demolished for the extension to go on. But also remember we redid the front steps in April and wished for a new balustrade? Well that's happening now, so you win some, you lose some.


There is so much thinking and planning that has gone into this, so we are pretty exhausted from all of it, and are about to attempt to live through the reno, so wish us luck! What's happening is the laundry area that is on the back of the house (down about four steps) is coming off and we are building out from the dining room (the set of three windows in the middle of the house pict above). Everything will be one level, we will get the laundry, a second bathroom and separate toilet, a living area, with a bay window (this is the part I'm most exciting about!) and then doors from the new living area out onto the deck.

Because most of the reno is happening on the back of the house, we should be able to just close the back door for most of it while they build the extension on, and then there will be a bit of uncomfortable time when they remove the wall where the door and windows are to connect everything together.


So much of this year has been spent in planning, thinking, evaluating, checking, rethinking and making responsible adult decisions. I know it's going to be a bit uncomfortable while the extension happens, but I'm starting to really look forward to what it's going to be like at the end of it. The outdoor living space that we can use even if it's raining, the bay window I can sit and read in, the extension/deck warming party we can have when it's all done.

Yes, 2018 has been an unexpectedly big year, but there are some good things coming, and I'm looking forward to it.

Saturday, August 11, 2018

The Latest

Sewed another dress. I feel bad that the majority of my posts are updates on things I have been sewing. Sorry people.


I do like this dress though. Mum and Dad bought the material back from one of their travels; I think it was maybe intended to be a table cloth. I didn't take a photo of the fabric (of course), but I had to think about how to cut it out to be a dress, because the darker color was only a section of the fabric, and I didn't know what to do with it at first.


Thankfully Mum gave me the advice to use it as a bodice, and the way I cut the sleeves, the color kind of merges in, to help make it all come together.


I fully lined the bodice (first time for this self-made pattern dress) and, of course, put in pockets. I also did a gathered skirt for the first time, which I like, but I think it makes the front bodice sit a little too high, so I'll have to fix that if I do a gathered skirt again.

Sophie took this photo for me (below). I think that back panel is my favorite part.


Thursday, August 09, 2018

Visual Stimulation

This is my life in the kitchen.


Every day a different configuration of all the essential nutrients, and some surplus ones.


I am hungry when I look at these.


And I feel proud. Because they are mostly delicious and nutritious.


More often than not the box comes home empty. So that's also good.


Will they ever want plain sandwiches?


 I hope not.


Because Japanese lunches are more fun.


And with my new rice cooker, with a timer function, morning rice is even easier to make.


We grew those snow peas in the garden.


I hope you are feeling inspired by healthy lunches, even if the pictures are not that good.


Some mornings I can't be bothered cut things. Good thing God gave us teeth.


Ahh, lunches.

Saturday, August 04, 2018

The Not Apron


As part of my exciting career in early childhood education and care, I get to claim face paints as a tax deduction. It's one of the perks. When I'm face painting, I have been using a random mix of face cloths and tea towels to clean my brushes, which were effective but ugly. I wanted to update to something else. 


When I made the Spur of the Moment quilt top, I had a few bits left over that didn't make it into the quilt, so I took that and an old bathmat we weren't' using any more, and got sewing.


I just stitched the material together into rough panels, and then quilted them straight onto the bathmat. Then I bound all the raw edges. I did extra with the binding, so I can wear it as an apron, but I actually don't see myself ever doing that. Good thing the ties are perfect for wrapping it all up so it looks pretty.


It's perfect to just put out on a table, set my paints up on half and then use the other half for wiping my brushes. And I can flip it over if I need to get a clean slate, for all those times I'm painting for four hours straight, like the kindy fete.


It's pretty and effective. I like it.

Friday, July 20, 2018

Jeans Quilt 3.0


It was time to finish it. I started it more than a year ago (see here). It lay around for a long time. I suppose these things take time, and a Jeans Quilt is no exception.


As intended, it's bigger than it's predecessors (Jeans Quilt and Jeans Quilt 2.0). It fits our queen bed with ease and is super warm. The jeans and pants came from everywhere. Some from Steve's sister Beck, others from people from our bible study (recognise them Valery?), some I don't even remember where from and then some of our own.


I am not sure when I finished procrastinating finishing the top, but it was done when I pulled it out at the start of winter. We were lucky to get the backing fleece for 30% off, because we needed a lot. It's not the prettiest of finishes, because of the thick denim and the batting and the fleece, but I don't mind. It keeps us warm.


Also, there was no way I could actually quilt the thing because it's enormous and heavy and my little Sally was struggling with just the binding. Oh well. I'm sure it will last as long as it needs to.


The girls love it, because they can lay it out, fold it in half, and they've got a great cosy warm place to play and hide in. Here is Rachel demonstrating:


I'll probably not make any more of these though, now that there is one for each of the beds, so I'll either have to think of a new way to use jeans or stop collecting them. Steve would probably vote for the latter. He might be right.... nah!

Saturday, July 14, 2018

Library Bag Mark 2

Rachel was the recent recipient of an excellent new Nature Explorer Bag, and when I was getting the material for it, it felt wrong not to be getting some for Sophie too. If Spotlight wasn't having a sale, I think sense would have won, but as it was, I got material for bags for both girls for $20, which is pretty good.

We have started going to the Library more regularly again, after a brief hiatus, caused by I have no idea what. I think part of the reason for the re-start is the stick insects, because our local library has some bush land and a park to play in right outside, so we can have a play and collect gum leaves for Rose and Twiggy while we are there, and since they need fresh leaves twice a week, it makes sense to capitalise on the trip.


Anyway, the library bags I made for the girls when they were smaller, are still good, but they have both grown out of them, so Rachel has inherited Sophie's (sorry second child) and Sophie was in need of a new one. This, coupled with the fact that a library bag was on her school book list for next year inspired me to get sewing.


Knowing it would probably be used for school, I modelled the design on a generic school-type one. This way, even if she has completely different fabric, it still kind of looks the same. Kind of.


Anyway, it's fully lined, got a little pocket on the inside for her library card, a Velcro closure, and a small space for her name in the bottom corner (as per the generic school-type ones). The stripy fabric is from the stash (hooray!), which I've used before in some bunting. It was a quick sew and came together easily and Sophie was delighted to take it to the library today to try it out.

Tuesday, July 10, 2018

Nature Explorer Bag

Rachel got a lot of nature presents for her birthday, being the bug lover that she is. She was so excited to go and look for insects and collect things on walks with her new treasures, but unfortunately, none of it came with a bag. The sewing mum in me responds to this predicament quickly: "Duty calls!"


I did a quick google for Nature Explorer Bags and found this pattern that I had seen a few years ago. I'll be honest, it doesn't have an exhaustive list of instructions or pictures, so you really need to know what you are doing to use it, but for a free pattern which meant I didn't have to guess sizes, it was perfect.


I did go to the stash to try to use up fabric for this project, but I didn't have anything sturdy enough for the outside of the bag that was really Rachel. I had white stuff, not ok for something that is going out into the wild, and some blue from the shorts I made for Sophie (here), but that seemed not great either, so I did splurge a bit and got more than enough of this great Japanese fabric from Spotlight.


The inside and trims of the bag are entirely from the stash though, the lady bugs are the last of the material that I made Rachel's Easter dress from, the floral is from some skirts, and I don't know where the blue check is from, but I assume a mysterious donation bag. I got the vinyl for the see-through pocket from one of those plastic pouches that sheets are in when you buy them. I even cut it so I could reuse the press studs, though I feel that was overkill now.


It's got pockets on the inside for all her insect collecting tools, and extra pockets on the outside for whatever. There is loads of space on the inside too. We took it for a road test to the part this morning and the kids played with it for over two hours, running through the bush, collecting bugs, looking at ants. It was great.


The thing that they all love is this compass that I spontaneously added. I think it came out of a Christmas cracker one year, so it doesn't work well (if at all), and I'm not sure why I kept it, but they love having it there. It's hooked on with a lanyard clip that I recycled from one of Steve's conferences. The adjustable strap clips came off my last backpack that I wore until the seams fell apart. Not sure if I'm hording too much stuff, but at least I'm using it up!


I love this bag for it's functionality, it's awesome bright material and it's total usability. Rachel loves it. We may go no where without it again. The only lament I have is that I sewed the front flap material on upside down and didn't realise until I had unpicked the top stitching twice and finally got it right the third time round. Rachel does not mind though, so let's go exploring!

Thursday, July 05, 2018

Stick Insect Home

When it came to what to get our little four year old Rachel for her birthday, we couldn't go past insects. Pretty much nothing else in the world delights her like animals, especially the small kind that she can interact with easily. So despite our aversion to pets, we decided to get her some stick insects. This of course also meant making space for an enclosure and getting said enclosure. 

Obviously, I love to make things, and any excuse to use power tools, so I made the enclosure for the birthday stick insects. 


I talked to another kindy dad for advice on enclosure making, as he had made one for his son's stick insects and was a wealth of information. I was going to try to make it out of wood that we had here, but that proved difficult to get enough wood that was the right size, so we ended up spending some money on pine at Bunnings. 


I didn't get too many work in progress shots, because, well I'm bad at it, and I was busy making, but here is one of me with the drill that dad took.


I started making at my parents because I wanted to use dad's fancy electric saw, rather than hand saw all of the cuts myself. Once we finished the cuts, Dad was pretty excited to help out, so we just kept going. Here is my Dad being handy too. Maybe this is where I get it from?


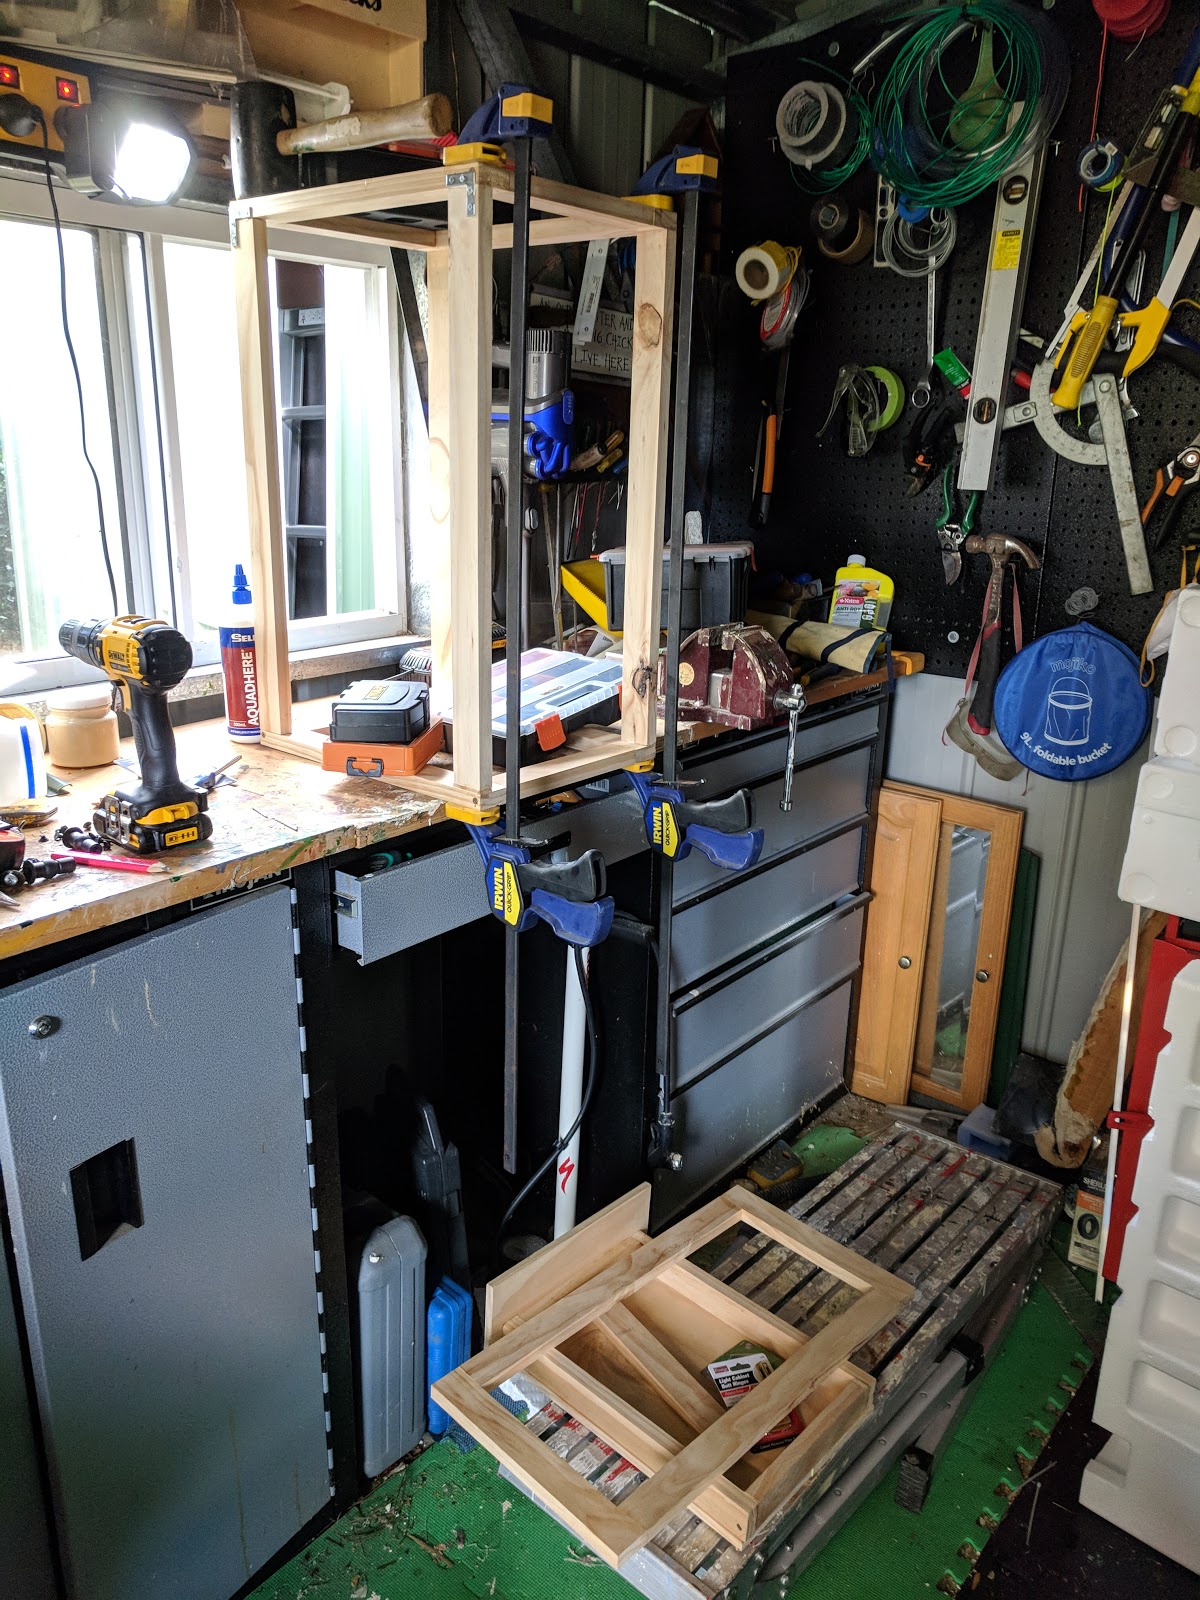
Here is a shot of the frame almost complete, clamped together while the glue dries before we put the final screws in. On the ground, you can see the door frame and the drawer which were both ready to go at that point.


I wish I had more photos of the enclosure as it was finished that day, because it was beautiful and everything worked superbly. Unfortunately, I decided to paint it to help it last longer, and this, it turns out was the wrong decision. The paint, which took ages to do, because it was winter and I did it over three rainy days (drying time was so so so long!), ended up being way too thick. The door didn't fit anymore, let alone open and close with ease, and the draw at the bottom was just not happening at all.

I ended up having to sand back most of the edges and we even had to take some wood off the drawer sides to get it in. At this point, the beautiful enclosure that we had made felt like it was starting to be a little less than perfect. I was not to know, that this would in fact, get worse.

I was using a set of old handles that my parents had given me. Maybe they came from their cupboards when they redid their bedroom? Anyway, there were four, which was perfect for the drawer, the door and then two handles on the top so I could easily pick up and move the enclosure. Excellent.

Except that the bolts for these handles were twice as long as needed.


Sigh. Do we cut them down? Do we get new ones? Do we pad it out? I ended up padding it out. Luckily I had enough extra wood lying around to do it, but it was painful. The wood is not sanded back, or cut straight, or the same colour as the rest of the enclosure. For the drawer, I unknowningly put the handle too high, and when it was padded out, the drawer ceased to close at all, so I had to take it off, putty the holes and put it on again lower down.

By the end of it all, I really did feel like this enclosure was totally hacked together. Notice I have not taken close ups of all the hacking we did? I'm not proud of it.


I am proud though, that at the end of the day, it works. The fly screen is left over from when we put fly screens on all the windows three and a half years ago. I knew it would come in handy. Oh, and the latch that's on the front is from one of the doors around the house. Probably one of the first things we removed when we bought the house seven and a half years ago now, so that we could paint. I don't know why we kept it, but I'm glad we did.


The enclosure holds the two spiny leaf stick insects that we got for Rachel perfectly. She has called them Twiggy and Rose, after about two and a half days of deliberation. So far we have kept them alive and they seem to enjoy living with us. We are lucky to live close to a park and the forest which provide an ample supply of gum leaves, so feeding these little ladies is fairly inexpensive.


Rachel loves them too, and wants all visitors to have their own stick insect experience.


Here is the enclosure where it lives in our house on top of the bookshelf. It works and most days you don't even notice the hacking. Whew.